Document version
Date |
2026-07-27 15:55:13 +0200 |
|---|---|
Branch |
|
Tags |
|
Revision |
35acb41fa6aec0dfb88a1e60a699df833686b7cb |
Creator’s guide
This document describes necessary steps how to install PDM.control in production environment. Used operating system is Ubuntu Linux 20.04. Installations steps are similar for different Linux distributions. Nevertheless there might be slight differences, which need to by solved by system administrator.
In case, that you want to run PDM.control under Windows even in production environment please contact our experienced server administrators at parking-helpdesk@rtb-bl.de and request appropriate documents.
1. Server environment
There are two ways possible. Either you install OS by your self(manual) or you let install it in hosting center. Preferred way is the second one to use hosting center. We recommend Digital Ocean (DO) because of variety of offered services and relative low prices.
1.1. Server environment
There are two ways possible. Either you install OS by your self(manual) or you let install it in hosting center. Preferred way is the second one to use hosting center. We recommend Digital Ocean (DO) because of variety of offered services and relative low prices.
1.1.1. Setup Digital Ocean account
Go to menu and insert you SSH key (see Generate key (PuTTY)).
1.1.2. Create server
Go to <your project> and click on Create button at the top of the screen. Select Droplets. From to option on new screen select flowing options:
-
Distributions: Ubuntu 20.04
-
Plan: Standard, 1CPU, 1GB RAM
-
Region: according your needs.
-
Additional options: Monitoring
-
Authentication: SSH keys
-
Host name, Tags … according your needs
-
Enable backup: Recommended
Click create droplet and you are good to go.
1.1.3. Check server
Swap
We need to be sure that the server has configured swap space. Otherwise can our application be terminated if there is not enough memory. Connect to the server and verify if there is swap space enabled. You should see something like this:
# swapon -s
Filename                Type        Size    Used    Priority
/swapfile               file        581564  577876  -2
If the output of swapon -s command produces empty table go to chapter Create swap space and create 1GB swap space according instructions found there.
1.2. Time zone
Check is time zone is set correctly for your server.
$ timedatectl
                      Local time: Wed 2020-02-12 11:58:43 CET
                  Universal time: Wed 2020-02-12 10:58:43 UTC
                        RTC time: Wed 2020-02-12 10:58:44
                       Time zone: Europe/Berlin (CET, +0100) (1)
       System clock synchronized: yes (2)
systemd-timesyncd.service active: yes
RTC in local TZ: no| 1 | Verify if the time zone is correct |
| 2 | Verify is time is synchronized If there is something which need to be fixed continue to chapter Time zone. |
1.3. SSH
In order to access the server from remote location it is necessary to configure SSH server.
1.3.1. Use certificate
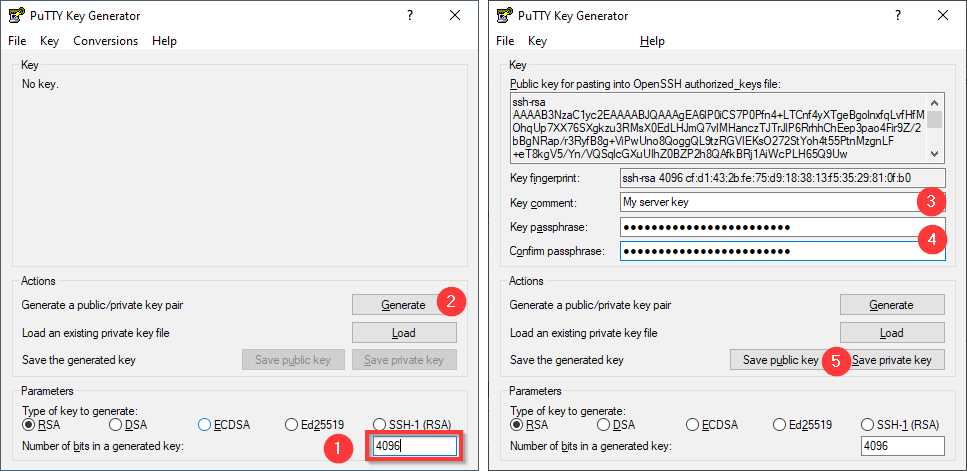
We strongly recommend key authentication. I you do not have any key yet refer to chapter Generate key (PuTTY) to create one.
Put key to the system
Create .ssh directory (if it does not exist yet) in your home directory:
$ mkdir -m 700 .sshInsert public key to file .ssh/authorized_keys.
If file does not exist create it with correct permissions.
Then insert public key as you see it in PuTTYgen’s text field at the top of the window.
$ touch .ssh/ authorized_keys
$ chmod 600 .ssh/ authorized_keys
$ nano .ssh/ authorized_keys
Test connection with key. Password shouldn’t be required.
Disable password login
To disable password authentication, edit /etc/ssh/sshd_config file.
# nano /etc/ssh/sshd_configFind this line:
#PasswordAuthentication yes
Change it to:
PasswordAuthentication no
Then find the ChallengeResponseAuthentication line.
Make sure it’s value is set to no like below.
If it’s set to yes, you can still use password to login.
ChallengeResponseAuthentication no
Save the file and restart ssh service.
# sudo systemctl restart sshNow if you (remotely) login without key, then login will be immediately rejected without asking password.
1.4. PostgreSQL 12
1.4.1. Prepare repository
The latest PostgreSQL is not available in standard repository of Ubuntu 20.04. We have to add a repository managed by PostgreSQL manually. The steps are taken from official documentation and Wiki. I just repeat (and clarify them) here.
Create the file repository configuration:
# sh -c 'echo "deb http://apt.postgresql.org/pub/repos/apt $(lsb_release -cs)-pgdg main" > /etc/apt/sources.list.d/pgdg.list'Import the repository signing key
# wget --quiet -O - https://www.postgresql.org/media/keys/ACCC4CF8.asc | apt-key add -Update the package lists
# apt update1.4.2. Install PostgreSQL
Install the PostgreSQL version 12 using following command
# apt install postgresql-{postgresql-ver}1.4.3. Configure database password
If you’re working from a default PostgreSQL installation, then PostgreSQL will be configured with the user postgres.
You need to set password to be able to connect from PDM.control
# su postgresthen attempt a connection to PostgreSQL:
$ psqlIn the PostgreSQL console set password by command
\password
Set new password and close console by \q command.
Then exit postgres user shell by exit command.
$ exit1.5. Java
We recommend to use java from AdoptOpenJDK provider. In order to get always the latest version it is preferred to setup repository. Go to official page and make setup according to the description there.
Install java
# apt install adoptopenjdk-11-hotspot-jre1.6. PDM.control
Crate database. First connect database via console.
# su postgres
$ psql
Create new database
CREATE DATABASE pdm_control;You may verify that the database is created by command \l. Then quit console by \q.
In order to improve security we will create new system user and group especially to run RTB applications. Let call the user rtb and the group rtb.
# addgroup --system rtb
# adduser --system --ingroup rtb --no-create-home --shell /bin/bash rtb
Crete home directory for PDM control and set rights
# mkdir /opt/pcon
# chown rtb:rtb /opt/pcon
# chmod 700 /opt/pcon
Copy war file provided by RTB to this directory new directory.
Add configuration file named application-linux-prod.yml.
To test application with console logging you may start it by command.
# runuser -l rtb -c 'java -Dspring.profiles.active=ubuntu-prod -Dlogging.config=classpath:logback-console-only.xml -jar pdm_control.war'PDM.control should be available on http://your-domain:8080. You should see login screen.
Put configuration to file application-ubuntu-prod.yml.
Either adapt provided sample or kontakt our helpdesk.
1.7. Front end server
In order to improve security and management of multiple applications running on the same server, it is recommended to install front end server. It is possible to choose between Nginx and Appach. We have chosen Nginx.
1.7.1. Server
The necessary steps are described here: How To Install Nginx on Ubuntu 18.04.
Brief summary follows.
As example domain is e1.rtp-parking.com taken.
Replace it by yours in all listings below.
# apt install nginxTest if it runs
# systemctl status nginxPut configuration for your domain. File name can be derived from you domain.
# nano /etc/nginx/sites-available/e1.rtp-parking.com.confFor PDM.control start with this configuration. It may be adjusted later.
server {
	server_name e1.rtp-parking.com;
	# Increase max file size to upload. Default 1MB
	client_max_body_size 8M;
	location / {
		# Default PDM.control port is 8080.
		proxy_pass http://127.0.0.1:8080;
		proxy_set_header X-Forwarded-For $proxy_add_x_forwarded_for;
		proxy_set_header X-Forwarded-Proto $scheme;
		proxy_set_header X-Forwarded-Port $server_port;
		proxy_set_header Host $http_host;
		proxy_headers_hash_max_size 512;
		proxy_headers_hash_bucket_size 128;
	}
}
Activate configuration
# cd /etc/nginx/sites-enabled
# ln -s /etc/nginx/sites-available/e1.rtp-parking.com.cfg
# nginx -t
# systemctl reload nginx
PDM.control should be available on http://e1.rtp-parking.com. You should see login screen.
1.7.2. HTTPS with certbot
Certbot is program which automatically install and re-new certificate with Let’s Encrypt services. Full installation steps are explained in article How To Secure Nginx with Let’s Encrypt on Ubuntu 20.04. For us important steps are summarized below.
Install certbot
Not needed for Ubuntu 20.04. Continue to next chapter.
Following steps are necessary only for Ubuntu 18.04
# add-apt-repository ppa:certbot/certbotAccept by pressing Enter.
# apt install python-certbot-nginxRequest certificate for your domain(s)
# certbot --nginx -d e1.rtp-parking.comContinue according steps from wizard. At the end choose to redirect from HTTP to HTTPS; option 2. Now should be PDM.control accessible by HTTPS on https://e1.rtp-parking.com/.
Post configuration
Post configuration is probably not needed in Ubuntu 20.04.
It seems that TLSv1 is not supported by default.
Continue to next chapter.
TLS
Test encryption strength by SSLlabs tool or just TLSTest.
A list of tools related to SSL is also here.
You should disable TLS 1.0 to improve security if you do not care about very old devices.
Open file /etc/nginx/nginx.conf and change line
ssl_protocols TLSv1 TLSv1.1 TLSv1.2;to
ssl_protocols TLSv1.2 TLSv1.3;TLS + Certbot
Certbot overwrites nginx’s protocol configuration in site configuration by line
include /etc/letsencrypt/options-ssl-nginx.conf; # managed by CertbotIt is necessary to change protocol definition also in this file. Change line ssl_protocols also to TLSv1.2 TLSv1.3.
ssl_protocols TLSv1.2 TLSv1.3;Then restart ngingx and test again with SSLlabs above.
Cipher selection
Use Mozilla’s Security/Server Side TLS and SSL configuration generator sites to fine tune configuration based on your security and compatibility needs.
Test certificate renewal
Test if certbot’s key renewal still works.
# certbot renew --dry-runHowever, this check may be insufficient in some cases. You may also test real key renewal.
# certbot renew --force-renewalFurther info How to remove TLSv1.0 / 1.1 and enable TLS 1.3 in Nginx.
|
If there is a need to remove certificate use command below (source) and the select certificate or specify certificate directly like this |
HTTP2
In site configuration file modify line
listen 443 ssl;to
listen 443 ssl http2;.See article: How To Set Up Nginx with HTTP/2 Support on Ubuntu 18.04.
Compression
Compression is enabled by default.
It can be fine tuned in file /etc/nginx/nginx.conf.
For example it can be restricted for some content types or responses up to some size.
gzip on;
# gzip_vary on;
# gzip_proxied any;
# gzip_comp_level 6;
# gzip_buffers 16 8k;
# gzip_http_version 1.1;
gzip_types text/plain text/css application/json application/javascript text/xml application/xml application/xml+rss text/javascript;
gzip_min_length 1000;1.8. Firewall
Before you start to use SSH you need to configure firewall to let pass SSH. Use following command to configure firewall
# ufw allow OpenSSHEnable firewall for nginx. It is necessary to open ‘Nginx Full’ profile, because for certbot’s key renewal is required open port 80.
# ufw allow 'Nginx Full'Allow also connections on port for PDM by command below:
# ufw allow 55200 comment 'PDM.control / PDMs'Real port number may be in your case different. Check your configuration.
1.9. Logs
Logs are very useful to investigate problems. They are store just next to application. There is very good log reading utility called lnav.
2. Maintanace tasks
2.1. Database logging
Not necessary for customer installations until required. First it is necessary to configure logging to be able to analyze something.
2.1.2. Database setup
What to log
First it is necessary to define what to log. The configuration below is recommend for further analysis with pgBadger (see chapter 4.1.3). See also pgBadger documentation.
# How slow query should be logged (ms)
log_min_duration_statement = 100
log_checkpoints = on
log_connections = on
log_disconnections = on
log_error_verbosity = default
log_line_prefix = '%t [%p]: [%l-1] user=%u,db=%d,app=%a,client=%h '
log_lock_waits = on
log_statement = 'none'
log_temp_files = 0
log_autovacuum_min_duration = 0
Where to log
Wee need extra directory for log files to avoid rotation by logrotate utility.
It is installed by PostgreSQL and takes care of files in path /var/log/postgresql/*.log.
We want to user logging collector provided by PostgreSQL which would collide with logrotate.
Therefore we will setup logging to different directory, /var/log/postgresql/sql.
Create new directory and set correct permissions:
# mkdir /var/log/postgresql/sql
# chown postgres:postgres /var/log/postgresql/sql
Enable log collector to be able to handle and rotate files by PostgreSQL background process. And configure logging according your needs. The example below keeps one week of logs.
logging_collector = on
# set logging directory
log_directory = '/var/log/postgresql/sql'
# long file name 'db-<day of week>. See https://www.tutorialspoint.com/c_standard_library/c_function_strftime.htm
log_filename = '%A.log'
# overwrite previous log file.
log_truncate_on_rotation = on
# enable rotation once a day.
log_rotation_age = 1d
# disable rotation on size.
log_rotation_size = 0
2.1.3. Result verification
For database analysis a tool named pgBadger (github) can be used.
Install either version from package manager (apt install pgbadger or compile latest from source code).
To generate single report from available log use command below. Replace paths by yours.
$ pgbadger --exclude-query="^(COPY|COMMIT|BEGIN)" --outdir /var/log/postgresql/html /var/log/postgresql/sql*.logIt is also possible to generate reports incrementally to keep history.
$ pgbadger --exclude-query="^(COPY|COMMIT|BEGIN)" --incremental --outdir /var/log/postgresql/html /var/log/postgresql/sql/*.logTo keep generation running it is recommended to put command above to cron scheduler.
Add following rule to editor opened by crontab -e command.
Of course execution time has to be adjusted
19 3 * * * pgbadger --exclude-query="^(COPY|COMMIT|BEGIN)" --incremental --quiet --outdir /var/log/postgresql/html /var/log/postgresql/sql/*.log2.1.4. Result on web
Result of database analyses can be also accessible via web for easier access.
To achieve it, change path for generated output to /var/www/pgbadger like this.
19 14 * * * pgbadger --exclude-query="^(COPY|COMMIT|BEGIN)" --incremental --quiet --outdir /var/www/pgbadger /var/log/postgresql/sql/*.logThen add new location to the PDM.control server like this.
location /pgbadger/ {
	root /var/www;
}
It is also recommend to secure the location by basic authentication to restrict access. See official nginx documentation.
Install package apache2-utils
# apt install apache2-utilsCreate user with password
$ htpasswd -c /etc/nginx/rtb_htpasswd adminAdd security configuration into location directive. The whole directive looks like this.
location /pgbadger/ {
	root /var/www;
	auth_basic "PgBadger";
	auth_basic_user_file /etc/nginx/rtb_htpasswd;
}
2.2. Monitor java processes
In order to get better understanding how java processes works it is possible to connect VisualVM tool to observe internal behavior. Follow steps bellow to connect remote java process via SSH tunneling.
2.2.1. Install VisualVM
Download and extract VisualVM. In order to run it it is necessary to set JDK home like this:
<visualvm_install_dir>/bin/visualvm --jdkhome <path_to_jdk_home>
It is convenient to create a shortcut or startup script to avoid retyping.
2.2.2. Allow remote connections
Add flowing configuration to PDM.control startup script
 -Dcom.sun.management.jmxremote.ssl=false\
 -Dcom.sun.management.jmxremote.authenticate=false\
 -Dcom.sun.management.jmxremote.port=6380\
 -Dcom.sun.management.jmxremote.rmi.port=6390\
 -Djava.rmi.server.hostname=localhost\
 -Dcom.sun.management.jmxremote.local.only=false\
Port numbers can be changed based on your system.
2.2.3. Connect from VisualVM
Add new local connection to port 6380. You should see the VM properties and charts. For more info see tutorial.
2.3. RTB data backup
This service is not available for customer installations. It only describes how backup of our cloud services works. Customer may use our solution as an example to build his own.
The general idea is two step backup process.
-
Server it self creates regularly backup files and store all of them in one directory (in primary location).
-
Backup collector collects regularly created backup files and store them outside cloud environment (at secondary location).
Because the backup server is located in physically different location it should be possible to recover data also in case of natural disaster affecting primary location.
Because backup server is not permanently connected with primary location should be this solution also resistant again ransom ware and other crypto-viruses.
The secondary location is the backup-ed to tape and move to tertiary location.
2.3.1. Backup creation procedure
Currently we backup only PDM.control database. Server with its configuration can be easily re-created from image.
User account
Creation
First we need to create new user account trough which the server collector will access prepared backups. Let call it rtb-backup.
# useradd -m --shell /bin/bash 'rtb-backup'Add user rtb-backup to group postgres to be able to use backup utility.
# usermod -a -G postgres rtb-backupConfiguration
In order to call pg_dump utility as postgres user without password it is necessary to allow it in sudousers.
Run visudo command and add following line (source) at the end of file before line #includedir /etc/sudoers.d.
rtb-backup ALL=(postgres) NOPASSWD: /usr/bin/pg_dump
Exit editor in order to apply change.
Security
Allow backup collector authorization using key
# su rtb-backup -
$ mkdir .ssh
$ chmod 700 .ssh/
$ touch .ssh/authorized_keys
$ chmod 600 .ssh/authorized_keys
Then add backup collector’s key to .ssh/authorized_key file.
Backup collector will log in via this account and will collect prepared scripts.
Backup script
Below is example of script which can be used to make a backup.
#!/usr/bin/bash
# Configuration
# Name of database to backup
DB_NAME="pcon_staging"

# Environment setting
TIMESTAMP=$(date --iso-8601='minutes')
BACKUP_DIR_FINAL=bk_$TIMESTAMP
# Directory where backup is in progress is prefixed by '_' character to avoid to collect incomplete backup.
BACKUP_DIR="_$BACKUP_DIR_FINAL"

echo "Creating backup directory $BACKUP_DIR_FINAL"
mkdir $BACKUP_DIR


# Backup database
echo "Running database backup for $DB_NAME ..."
DB_BACKUP_FILE=$BACKUP_DIR/$DB_NAME.backup
touch $DB_BACKUP_FILE
chgrp postgres $DB_BACKUP_FILE
chmod 664 $DB_BACKUP_FILE
sudo -u postgres pg_dump --format custom --file $DB_BACKUP_FILE $DB_NAME

# Mark backup as completed.
mv $BACKUP_DIR $BACKUP_DIR_FINAL
echo "Backup finished"
It can be put to file /home/rtb-backup/backup.sh.
To call it regularly create a cron job for it
# sudo -u rtb-backup crontab -eAdd flowing line to crontab file. It will run the scrip every day at 4:47
47 4 * * * backup.sh
2.4. RTB server administrator
Preface
There may be situation when I am not available and PDM.control stops to work. Unfortunately we do not have any real system administrator, which could fix the cause of the problem in such a case. Nevertheless production PDM.control changes its version not so oft and if there is a problem, it is mostly temporal. In such situations should be enough to restart the service. When I am back I can properly analyze problem.
For this reason there is crated new user rtb-admin with privilege to restart PDM.control service an the whole virtual machine (for the case that restarting the service does not help).
2.4.1. User configuration
Create new user for "administrative" purposes and add it to rtb group in order to be able to see application logs.
# useradd -m  --shell /bin/bash  'rtb-admin'
# usermod -a -G rtb 'rtb-admin'
Privilege the rtb-admin user to restart PDM.control service and computer.
Run visudo command and add following line at the end of file.
rtb-admin ALL=(root) NOPASSWD: /usr/bin/systemctl restart pdm_control,/usr/bin/systemctl restart pdm_control.service,/usr/sbin/reboot
Now the user rtb-admin can run following commands as root user without password prompt.
-
sudo systemctl restart pdm_control -
sudo systemctl restart pdm_control.service -
sudo reboot
It is also recommended to setup key authorization for rtb-admin user.
2.4.2. Security configuration
Allow users from rtb group to see content of /opt/pcon especially log files.
# chmod 750 /opt/pcon
# chmod 750 /opt/pcon/logs
# chmod 750 /opt/pcon/logs/archived
Be sure to not allow this user to see content of configuration file. It contains credential to various services.
# chmod 700 /opt/pcon/application-ubuntu-prod.ymlIf you version configuration in git do not forget also to protect .git directory.
# chmod 700 /opt/pcon/.git3. Manual tasks
This chapter describe how to perform some administration tasks in case that you running server on your own. Usually it is not needed in hosting environment.
3.1. Key authorization
In order to increase security it is strongly recommended to disable remote login with password. Only keys will be used.
3.2. Create swap space
Swap is a space on a disk that is used when the amount of physical RAM memory is full. When a Linux system runs out of RAM, inactive pages are moved from the RAM to the swap space.
Swap space can take the form of either a dedicated swap partition or a swap file. In most cases when running Linux on a virtual machine a swap partition is not present so our only option is to create a swap file.
This tutorial was tested on Linux systems with Ubuntu 18.04 and CentOS 7 but it should work with any other Linux distribution.
3.2.1. Add swap file
Become root and follow these steps to add 1GB of swap to your server. If you want to add 2GB instead of 1 GB, replace 1G with 2G.
Create a file which will be used for swap
# fallocate -l 1G /swapfileIf faillocate is not installed or if you get an error message saying fallocate failed: Operation not supported, then you can use the following command to create the swap file:
# dd if=/dev/zero of=/swapfile bs=1024 count=1048576Set the correct permissions
Only the root user should be able to write and read the swap file. To set the correct permissions, type:
# chmod 600 /swapfileSet up a Linux swap area
Use the mkswap utility to set up the file as Linux swap area:
# mkswap /swapfileEnable the swap
Activate the swap file with the following command:
# swapon /swapfileTo make the change permanent open the /etc/fstab file and append the following line:
/swapfile swap swap sw 0 0
Verify the swap status
To verify that the swap is active we can use either the swapon or the free command as shown below:
# swapon --show
NAME		TYPE	SIZE	USED	PRIO
/swapfile	file	1024M	507.4M	-1
# free -h
total used free shared buff/cache available
Mem: 488M 158M 83M 2.3M 246M 217M
Swap: 1.0G 506M 517MSdjust the swappiness value
Swappiness is a Linux kernel property that defines how often the system will use the swap space. Swappiness can have a value between 0 and 100. A low value will make the kernel to try to avoid swapping whenever possible while a higher value will make the kernel to use the swap space more aggressively.
The default swappiness value is 60. You can check the current swappiness value by typing the following command:
# cat /proc/sys/vm/swappiness
60
While the swappiness value of 60 is OK for most Linux systems, for production servers you may need to set a lower value. For example, to set the swappiness value to 10, type:
# sysctl vm.swappiness=10To make this parameter persistent across reboots append the following line to the /etc/sysctl.conf file:
vm.swappiness=10The optimal swappiness value depends on your system workload and how the memory is being used. You should adjust this parameter in small increments to find an optimal value.
Remove swap file
If for any reason you want to deactivate and remove the swap file, follow these steps:
First, deactivate the swap by typing:
# swapoff -v /swapfileRemove the swap file entry`/swapfile swap swap defaults 0 0` from the /etc/fstab file.
Finally delete the actual swapfile file using the rm command:
# rm /swapfile3.3. Time configuration
3.3.1. Time zone
To see list all available time zones, enter:
$ timedatectl list-timezones$ timedatectl list-timezones | more$ timedatectl list-timezones | grep -i europeTo set the time zone to Europe/Berlin, enter:
# timedatectl set-timezone 'Europe/Berlin'Verify it:
$ timedatectl3.3.2. Time
How to change the current date
To change the current date, type the following command as root user:
# timedatectl set-time YYYY-MM-DDFor example set the current date to 2015-12-01 (1st, Dec, 2015):
# timedatectl set-time '2015-12-01'To change both the date and time, use the following syntax:
# timedatectl set-time YYYY-MM-DD HH:MM:SSWhere,
-
HH: An hour.
-
MM: A minute.
-
SS: A second, all typed in two-digit form.
-
YYYY: A four-digit year.
-
MM: A two-digit month.
-
DD: A two-digit day of the month.
For example, set the date ’23rd Nov 2015′ and time to ‘8:10:40 am’, enter:
# timedatectl set-time '2015-11-23 08:10:40'Verify by by date command.
3.4. Increase virtual disk size
This manual is valid for Virtual box or custom hosting. Digital ocean resizes disk automatically.
Default root partition has size 10 GB. It should be enough for small to medium installation. If there is a need for more space in the future then the partition can be extended. This is two step process. The example below shows how to resize partition from 10 GB to 15 GB.
Virtual box
Resize the virtual disk by using command below. 15000 is new size in mega bytes.
c:\VMs\Server>"C:\Program Files\Oracle\VirtualBox\VBoxManage.exe" modifymedium "root.vdi" --resize 15000
0%...10%...20%...30%...40%...50%...60%...70%...80%...90%...100%
Find out which partition is mounted as root by df -h command.
You can get following output:
$ df -h
Filesystem      Size  Used Avail Use% Mounted on
udev            966M     0  966M   0% /dev
tmpfs           200M  984K  199M   1% /run
/dev/sda2       9.8G  2.0G  7.4G  21% /
/dev/loop0       89M   89M     0 100% /snap/core/7270
In our case is the correct partition /dev/sda2.
Review disk partitions and free space by parted command.
# parted /dev/sdaIt will warn us about extra space. Choose to fix it.
Warning: Not all of the space available to /dev/sda appears to be used, you can fix the GPT to use all of the space (an extra 9748480 blocks) or continue with
the current setting?
Fix/Ignore? F
Write command print free and press enter. Then it can bee seen that there is 5GB free space.
(parted) print free
Model: ATA VBOX HARDDISK (scsi)
Disk /dev/sda: 15.7GB
Sector size (logical/physical): 512B/512B
Partition Table: gpt
Disk Flags:

Number  Start   End     Size    File system  Name  Flags
        17.4kB  1049kB  1031kB  Free Space
 1      1049kB  2097kB  1049kB                     bios_grub
 2      2097kB  10.7GB  10.7GB  ext4
        10.7GB  15.7GB  4992MB  Free Space
Insert command resizepart.
Next prompt asks about partition number.
In this case enter 2.
Confirm warning that the partition is in use.
(parted) resizepart 2
Warning: Partition /dev/sda2 is being used. Are you sure you want to continue?
Yes/No? y
End?  [10.7GB]? 100%
Enter new end of partition in mega bytes or simply 100%.
Verify that there is no more free space by entering print free command.
Free space should not be visible any more and the partition 2 should have size 15GB.
(parted) print free
Model: ATA VBOX HARDDISK (scsi)
Disk /dev/sda: 15.7GB
Sector size (logical/physical): 512B/512B
Partition Table: gpt
Disk Flags:

Number  Start   End     Size    File system  Name  Flags
        17.4kB  1049kB  1031kB  Free Space
 1      1049kB  2097kB  1049kB                     bios_grub
 2      2097kB  15.7GB  15.7GB  ext4
We are done with parted. You may leave it by entering quit command. Now is the partition extended. Wee need to extend also file system. This is done be command:
# resize2fs /dev/sda2
resize2fs 1.44.1 (24-Mar-2018)
Filesystem at /dev/sda2 is mounted on /; on-line resizing required
old_desc_blocks = 2, new_desc_blocks = 2
The filesystem on /dev/sda2 is now 3839483 (4k) blocks long.
You can check new partition size by command df.
$ df -h
Filesystem      Size  Used Avail Use% Mounted on
udev            966M     0  966M   0% /dev
tmpfs           200M  988K  199M   1% /run
/dev/sda2        15G  2.0G   12G  15% /
/dev/loop0       89M   89M     0 100% /snap/core/7270